# How to Set a Table for 8: Layouts and Free Checklist

Set a table for 8 with rectangular and round seating diagrams, simple place settings, counted supplies and a free A4 or Letter checklist.

Canonical: https://feteandfig.com/stories/dinner-table-for-eight
Author: Fête & Fig Editorial (https://feteandfig.com/about)
Published: 2026-09-10T00:00:00.000Z
Updated: 2026-10-16T22:19:09.000Z

To set a dinner table for eight, arrange **eight chairs around the table**, then lay eight simple place settings: one dinner plate, fork, knife, water glass and napkin per person. For the meal below, keep dessert pieces and two spare settings nearby. Try the real serving dishes before adding flowers.

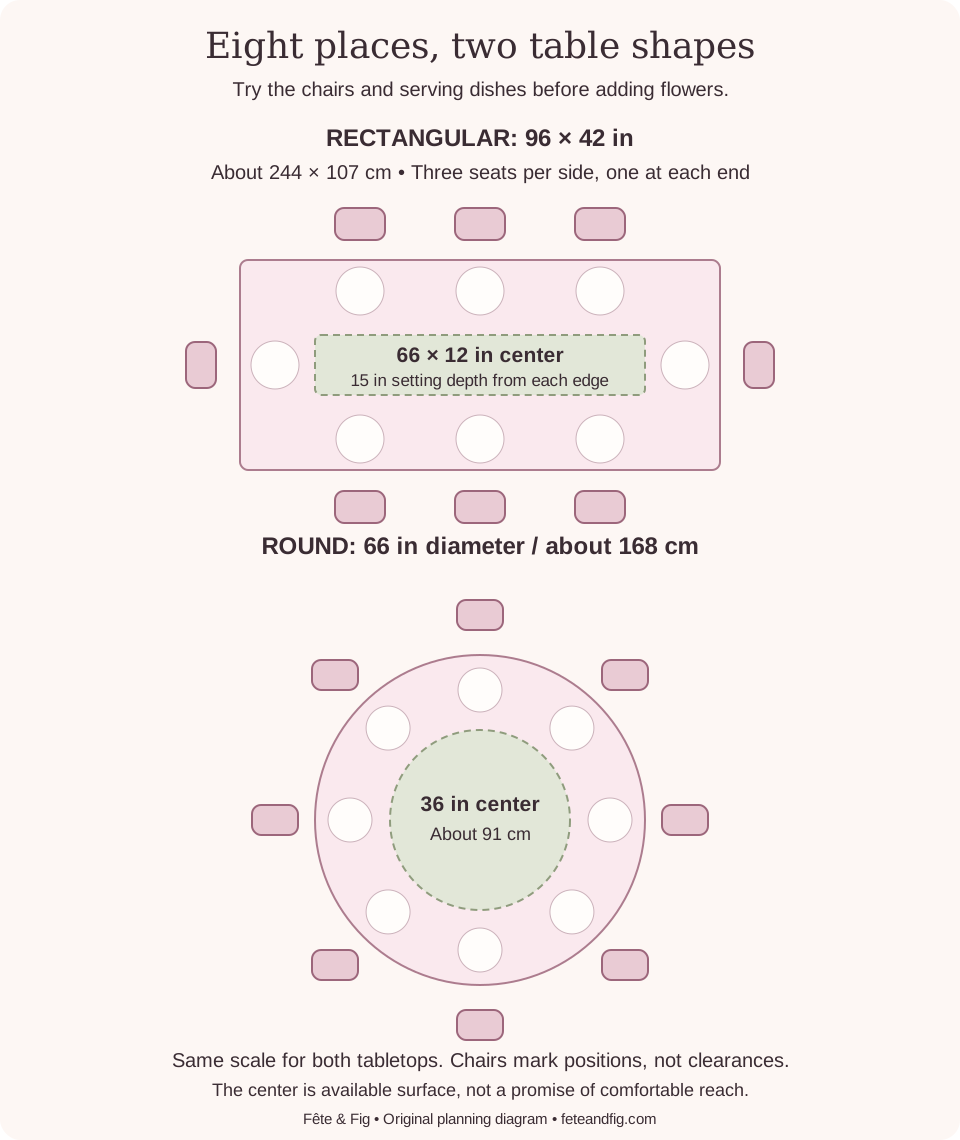
The two proposed layouts below use a 96 × 42-inch rectangular table or a 66-inch round table. They are planning examples, not minimum-size rules. Chair arms, table legs, the surrounding room and individual access needs can change what fits. Both examples serve the main from a sideboard and leave a modest center area for smaller dishes.

## Check the eight-seat layout first

| Your table shape | Seat positions in this example | Check before laying the cloth |
| --- | --- | --- |
| Rectangular, 96 × 42 inches | Three along each long side and one at each end; side-seat centers at 24, 48 and 72 inches from one short end | The 24-inch center spacing does not guarantee clearance for your chair arms, legs or place settings. |
| Round, 66-inch diameter | Eight evenly spaced seats, 45 degrees apart | About 26 inches of curved edge per seat is an edge calculation, not an elbow-space guarantee. |

<figure class="content-diagram">
  <img src="/images/diagrams/dinner-table-eight-layout.svg" width="960" height="1140" loading="lazy" decoding="async" alt="Two measured table options for eight: a ninety-six by forty-two-inch rectangle with three seats along each side and one at each end, and a sixty-six-inch round with eight evenly spaced seats." />
  <figcaption>Original layout examples. The table shapes use the same drawing scale; chair symbols mark seating positions. Room size, pulled-out chairs and accessible routes must be checked separately. <a href="/images/diagrams/dinner-table-eight-layout.svg">Open the full-size table layouts</a>.</figcaption>
</figure>

For either shape, use the [counted supply list](#gather-one-counted-set-of-supplies), follow [Step 1's measured layout](#step-1-choose-a-shape-and-check-every-seat), then complete the [seated check](#step-6-complete-the-seated-check). If eight people do not fit comfortably with the actual chairs and room routes, change the seating plan before sending the [dinner invitations](/stories/dinner-party-invitation-wording).

## Download the table-for-eight setup sheet

- [A4 table-for-eight setup sheet, one page](/downloads/dinner-table-for-eight-setup-a4.pdf)
- [US Letter table-for-eight setup sheet, one page](/downloads/dinner-table-for-eight-setup-letter.pdf)

The sheet brings the two proposed layouts, supply counts and six setup checks together, with space to write your own table and cloth measurements. Choose the file for your paper. It is a reference checklist, not a full-size table template or a fillable PDF. Use the main guide for the explanations and check actual seats and routes in the room.

## Gather one counted set of supplies

This list assumes a main course followed by a dessert eaten with a fork. It does not include a separate soup or salad course. Change the utensils when the menu changes, and keep the two spare settings off the table.

| Piece | Gather | Put on the table at first |
| --- | --- | --- |
| Dining chairs | 8 | All 8, with a usable route to each seat |
| Dinner plates, dinner forks and knives | 10 of each | 8 of each; 2 spares of each stay nearby |
| Water glasses and napkins | 10 of each | 8 of each; 2 spares of each stay nearby |
| Dessert plates and dessert forks | 10 of each | None; bring 8 of each with dessert |
| Water jugs | 2 | One at either end of the sideboard, with refills available |
| Small serving bowls | 2 | Try their actual footprints before choosing the centerpiece |
| Serving utensils | 1 for each dish | Put each utensil beside the dish it serves |
| Stable bud vases | 3 | Keep all 3 low enough for conversation across the table |
| Battery-operated LED candles | 2, if wanted | Add only where they will not crowd glasses or serving dishes |

Borrow a missing matching piece only if you need it. Different plate sets can share a table: use the same napkin color or repeat the sets in pairs. Extra decorative plates add washing and occupy space, so this arrangement starts with one dinner plate per person.

## Mix two dinnerware sets without missing a place

Count usable pieces before choosing the pattern. A plate with a chip or a glass you do not intend to use does not belong in the usable count. Different sets can share a table, but every diner still needs the pieces for the same actual menu. This example keeps the guide's **eight diners plus two off-table spares**; it does not require ten matching pieces.

<table>
<caption>Illustrative mixed inventory for the main course and dessert</caption>
<thead><tr><th scope="col">Piece</th><th scope="col">Usable stock</th><th scope="col">Target</th><th scope="col">Action before setting</th></tr></thead>
<tbody>
<tr><th scope="row">Dinner plates</th><td>4 from set A + 6 from set B = 10</td><td>10</td><td>Use 4 A + 4 B; hold 2 B as spares.</td></tr>
<tr><th scope="row">Dinner forks</th><td>5 + 4 = 9</td><td>10</td><td>Borrow 1 usable fork; put 8 at places and hold 2 nearby.</td></tr>
<tr><th scope="row">Dinner knives</th><td>6 + 5 = 11</td><td>10</td><td>Use 8, hold 2 spares and leave 1 out of this plan.</td></tr>
<tr><th scope="row">Water glasses</th><td>5 + 5 = 10</td><td>10</td><td>Use 8 and hold 2 spares.</td></tr>
<tr><th scope="row">Napkins</th><td>4 + 6 = 10</td><td>10</td><td>Use 8 and hold 2 spares; two colors can repeat with the plates.</td></tr>
<tr><th scope="row">Dessert plates</th><td>6 + 3 = 9</td><td>10</td><td>Borrow 1, then keep all 10 off-table until dessert.</td></tr>
<tr><th scope="row">Dessert forks</th><td>6 + 4 = 10</td><td>10</td><td>Keep all 10 off-table; bring 8 after clearing the main.</td></tr>
</tbody>
</table>

For any row, **missing pieces = max(0, 10 − usable stock)**. Check dinner and dessert separately: ten dinner plates do not resolve a shortage of dessert plates when you plan to clear them between courses. Label borrowed pieces discreetly underneath or record their owner before mixing them into the wash.

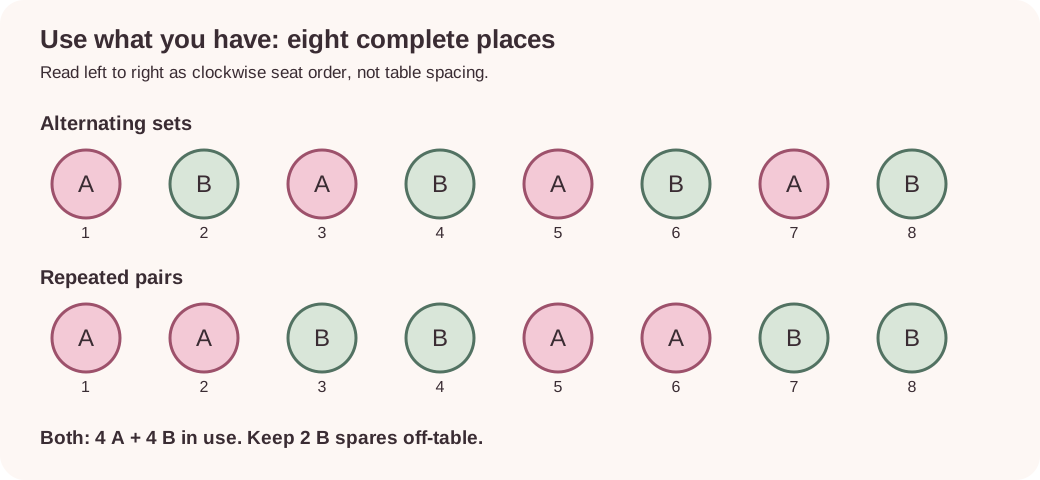
Choose one of two plate patterns. Number the eight seat positions **clockwise around the table**, beginning at a place you can identify; these are sequence numbers, not a drawing of room clearance.

| Position | 1 | 2 | 3 | 4 | 5 | 6 | 7 | 8 |
| --- | --- | --- | --- | --- | --- | --- | --- | --- |
| Alternating sets | A | B | A | B | A | B | A | B |
| Repeated pairs | A | A | B | B | A | A | B | B |

Both patterns use exactly four A plates and four B plates, leaving the other two B plates nearby. A full-looking stack is not enough evidence: lay out the eight complete places, then physically separate the spare pieces. Compare each plate's usable food surface and footprint; the same color cannot make different sizes serve the same course comfortably. Use the measured layout below to check the larger plate at its actual seat.

<figure class="content-diagram">
  <img src="/images/diagrams/dinnerware-eight-patterns.svg" width="1040" height="480" loading="lazy" decoding="async" alt="Two numbered sequences of eight dinner plates. Alternating uses A B A B A B A B; repeated pairs use A A B B A A B B. Both need four A plates and four B plates, with two B spares off-table." />
  <figcaption>Original plate-allocation diagram for the stock example above. The rows show clockwise seat order, not physical table spacing. <a href="/images/diagrams/dinnerware-eight-patterns.svg">Open the full-size plate pattern diagram</a>.</figcaption>
</figure>

## Step 1: Choose a shape and check every seat

For the rectangular example, place three chairs along each long side and one at each end. Mark the three long-side seat centers 24, 48 and 72 inches from the same short end. This gives adjacent side seats 24 inches between centers while keeping them away from the corners. It does not account for wide armchairs or obstructing table legs; test those separately.

For the round example, eight positions divide the circumference into eight equal arcs. A 66-inch diameter gives about 26 inches of curved table edge per person. That number is an edge-length calculation, not a measurement of elbow space. A 60-inch round gives about 23½ inches per person by the same calculation and needs a particularly careful chair and place-setting check.

| Planning measurement | Rectangular example | Round example |
| --- | --- | --- |
| Tabletop | 96 × 42 inches, about 244 × 107 cm | 66-inch diameter, about 168 cm |
| Seating | 3 on each long side, 1 at each end | 8 evenly spaced positions |
| Edge or center calculation | 24 inches, about 61 cm, between neighboring long-side seat centers | About 26 inches, or 66 cm, of curved edge per person |
| Illustrative place-setting depth | 15 inches, about 38 cm, measured inward from the edge | The same 15-inch depth |
| Space remaining inside that depth | A 66 × 12-inch central strip, about 168 × 30 cm | A 36-inch diameter circle, about 91 cm |
| Serving choice | Main on sideboard; small bowls only where they fit | Main on sideboard; keep the center within comfortable reach |

The 15-inch depth is an allowance for this drawing, not a standard that makes every setting fit. Lay out your actual plate, cutlery and glass. Larger pieces can use more depth, and the usable center becomes smaller.

Pull each chair out, sit down and stand again. Have a second person walk past the occupied chairs where a route is needed. Test the route from the entrance to the table, kitchen and bathroom with any mobility equipment guests use. If this fails, reduce furniture elsewhere or choose a different seating plan before laying the cloth.

## Step 2: Reserve the serving area

Place the empty serving bowls on the table. A narrow rectangular center may hold two compact bowls in a line, but a casserole dish, flowers and water jugs can quickly fill it. Move the main dish to a protected sideboard and bring portions to the table, or let guests serve themselves where the route works.

For the round table, avoid relying on guests to reach across its center. Pass a light bowl or ask the person nearest the dish to help. Keep heavy or hot vessels on the sideboard with a trivet and the correct serving utensil. The measured center area in the diagram is available space, not a promise that every part is easy to reach.

Put a clean landing tray near the kitchen for used dishes. This gives clearing a destination without borrowing room from the guests' place settings.

## Step 3: Lay the cloth and plates

For a 15-inch drop all around the rectangular example, use a finished 126 × 72-inch cloth, about 320 × 183 cm. For the round example, a finished 96-inch round cloth gives the same 15-inch drop. These sizes come from adding twice the desired drop to each table dimension.

For your own measurements, use the [tablecloth size guide and calculator](/stories/tablecloth-size-guide). It also checks the actual drop of a cloth you already have, including unequal end and side drops.

Measure a cloth you already own before buying another. A shorter even drop is fine for this informal dinner. Fabric should not pool under feet or interfere with chairs. Smooth out the cloth, center each plate on its chair and leave a small margin between the plate and table edge.

## Step 4: Add the cutlery and glasses

Put the dinner fork on the left and the knife on the right, blade toward the plate. Place the water glass above the knife, following the simple arrangement in [Emily Post's table-setting guidance](https://emilypost.com/advice/table-setting-guides). Check it from the seated position: a glass that looks symmetrical from above may still be awkward to reach.

Fold the napkin into a simple rectangle on or beside the plate. Bring dessert forks with dessert so they do not occupy the top of the setting all evening. Offer a second glass when it is needed for the drinks you are serving.

For a plated meal with several courses, use the [formal table setting and clearing sequence](/stories/formal-table-setting) to decide which pieces start on the table and which arrive later. For the fabric movements, the [four napkin folds](/stories/napkin-folding-ideas) include a diagram for every step. Then return to this guide to check the finished pieces within each seat's actual footprint.

## Step 5: Use the space left for decoration

Place the three little vases between the serving positions. Try three in a line on the rectangle or a loose group on the round table. Sit at both ends and on both sides to check that flowers do not hide faces.

Add the two LED candles only if the arrangement still leaves room for hands, utensils and passed dishes. Switch them on before guests arrive and use a nearby lamp if the table is too dim to read a menu. Leave scented candles and large branches out of the food area.

For an autumn version, the [fall table setting](/stories/fall-table-setting) groups the decoration on two small trays that can be lifted away before dinner. It includes a counted styling list and a drawing of the table before and during the meal.

If your table is round, the [winter dinner table for six](/stories/winter-dinner-table) works through a different geometry, with individual low decorations and a central area for smaller shared dishes. Its six-person count and circular layout are separate from this eight-person rectangle.

## Step 6: Complete the seated check

Sit at the most constrained place with a plate, knife, fork and filled water glass. Check elbow movement and the space between neighboring glasses. Look under the table for legs, cables or folds of cloth that block feet. Count the eight finished settings, then stop adding objects.

Use the [dinner party menu and service plan](/stories/elegant-dinner-party-at-home) to connect this table to the kitchen schedule. The [editable menu card](/printables/menu-card) is useful if guests need to see several dishes or the order of the meal. Two menu cards on a sideboard can do that job without taking space from eight diners.

## Optional tools for this guide

Paid links: we may earn a commission. As an Amazon Associate I earn from qualifying purchases.

These are listing-based selections, not hands-on product tests. Illustrations in the HTML guide show tool types, not the listed products. Check current price and availability on Amazon.

### DII Off-white cotton napkins, set of six

20 × 20 inches · 100% cotton. Repeat one napkin colour across the two dinnerware sets while using pieces you already own.

Before buying: Eight diners plus two spares need ten usable napkins. Subtract your own stock before rounding six-piece packs; check the care label for shrinkage.

<a href="https://www.amazon.com/dp/B09NJQ8FRD?tag=ffig-table-20" rel="sponsored noopener">Check DII Off-white cotton napkins, set of six on Amazon</a>


## Images from this guide

![Eight ivory plates with blush napkins around a linen-covered rectangular table, with three small bud vases.](https://feteandfig.com/images/dinner-table-for-eight-linen-room-1600.webp)

Eight simple settings leave an open center and a separate serving sideboard. AI-created styling concept.

![An ivory plate and blush linen napkin with a fork on the left, inward-facing knife on the right and water glass above.](https://feteandfig.com/images/dinner-table-for-eight-place-setting-1600.webp)

A single plate, fork, knife and water glass keep the setting simple. AI-created styling concept.

![Two empty serving bowls, a stone trivet, a landing tray and two water jugs arranged on an oak sideboard.](https://feteandfig.com/images/dinner-table-for-eight-sideboard-preparation-1600.webp)

Reserve serving and clearing space before bringing out the meal. AI-created styling concept.


## Sources and file checks

We checked the eight-seat counts, center-space and cloth calculations, then generated and inspected the one-page A4 and Letter setup sheets. These layouts are planning examples, with AI-created styling images. We have not tested the arrangement with guests or on a physical printer; check your chairs, pieces and routes in person.

- [Emily Post: Table Setting Guides](https://emilypost.com/advice/table-setting-guides): Basic fork, knife and water-glass positions. Our table sizes, setting-depth allowance and spare counts are proposed planning examples.

[How we prepare and check our guides](https://feteandfig.com/editorial-policy)