# Bridal Shower Favors: Three Measured Projects with Free Paper Patterns

Make bridal shower favors with original tea-wallet, cloth-napkin-band and bookmark-sleeve patterns, sample-fit checks and free Letter or A4 templates.

Canonical: https://feteandfig.com/stories/bridal-shower-favors
Author: Fête & Fig Editorial (https://feteandfig.com/about)
Published: 2026-10-07T00:00:00.000Z
Updated: 2026-10-08T00:00:00.000Z

Good **bridal shower favors** do not need elaborate packaging. They need an item the guest can use, a finish that holds together and enough clarity that nobody wonders whether the object on the table is decoration or something to take home.

These three projects are specific enough to make from a pattern: a small paper wallet for an individually sealed tea sachet, a loose band around a reusable cloth napkin and a bookmark with a protective sleeve. The dimensions are original design specifications, with geometry checked in the digital files. **We have not physically made or tested these patterns.** Print one sample, use your actual item and paper, and adjust the fit before buying for the whole group. The AI-created pictures show a styling direction; they are not assembly evidence.

## Choose one project before buying materials

<table>
<caption>Three bridal shower favor projects, with the item and the fit to check</caption>
<thead><tr><th scope="col">Project</th><th scope="col">Useful item</th><th scope="col">Pattern specification</th><th scope="col">Sample must pass</th></tr></thead>
<tbody>
<tr><th scope="row">Tea sachet wallet</th><td>One individually sealed tea packet</td><td>5¾ × 4¼-in blank; two 2¾-in panels and a ¼-in spine</td><td>Packet at most 2½ × 3¾ × ⅛ in fits without bending its seal</td></tr>
<tr><th scope="row">Cloth napkin band</th><td>One cloth napkin for the guest to keep</td><td>9½ × 1½-in strip; ½-in overlap gives a 9-in closed loop</td><td>Actual rolled bundle circumference at most 8½ in; band slides off easily</td></tr>
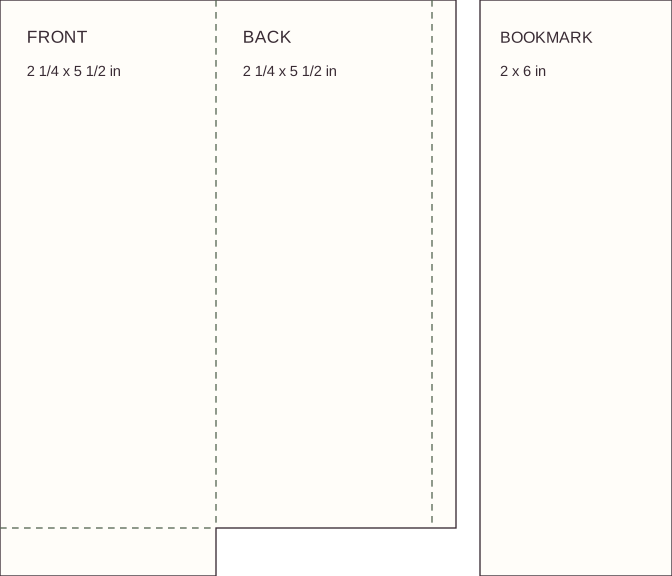
<tr><th scope="row">Bookmark and sleeve</th><td>A 2 × 6-in bookmark</td><td>4¾ × 6-in sleeve net; closed pocket 2¼ in wide and 5½ in high before paper thickness</td><td>Bookmark enters without forcing and protrudes about ½ in for removal</td></tr>
</tbody>
</table>

Tea suits a [bridal shower tea party](/stories/bridal-shower-tea-party). A cloth napkin makes sense when a textile favor is within the agreed budget. A bookmark is lighter to prepare and keeps the useful part simple. There is no requirement to make all three. Finish one complete sample before committing to a color or material order.

## Check the print scale and materials

Use the PDF for full-size patterns. Choose A4 for A4 paper or US Letter for Letter paper, set **actual size or 100%**, and turn off fit-to-page scaling. Page two, the long napkin band, is landscape. The other pages are portrait. Let the printer rotate pages as needed, but do not allow it to shrink them to fit.

Measure the printed calibration line with a ruler: it should be **1 inch, or 25.4 mm**. If it differs, correct the print setting before cutting. The downloadable SVGs retain physical dimensions, but a browser's print dialog can rescale them; the paper-size-specific PDF is the easier choice.

Print the pattern on plain paper, cut it out and trace the outline and fold positions onto your chosen favor paper. The labels inside the pattern are assembly guides, not decoration for the finished gift. Cut and crease the traced blank, then add your own note or leave it plain.

Use paper that your printer supports if you print your own final design. Try the wallet and sleeve with flexible uncoated cover paper before buying a heavy board. Test any adhesive on scraps and allow it to dry according to its instructions. Keep paper adhesive away from food and cloth. The tea stays inside its original sealed wrapper; the decorative wallet is not a food-contact pouch.

## Make a wallet for an individually sealed tea sachet

You need one compatible sealed tea packet, one wallet blank, a ruler, cutting tool, a blunt scoring tool and about 18 inches of ribbon for the proposed closure. The ribbon length is a starting allowance; make the actual knot or bow on your sample before cutting the whole batch.

<figure>
<img src="/images/bridal-favor-tea-wallet.svg" alt="Original tea-wallet pattern: a 5.75 by 4.25-inch rectangle with vertical folds 2.75 and 3 inches from the left edge, leaving a quarter-inch spine." width="828" height="612" loading="lazy" decoding="async" />
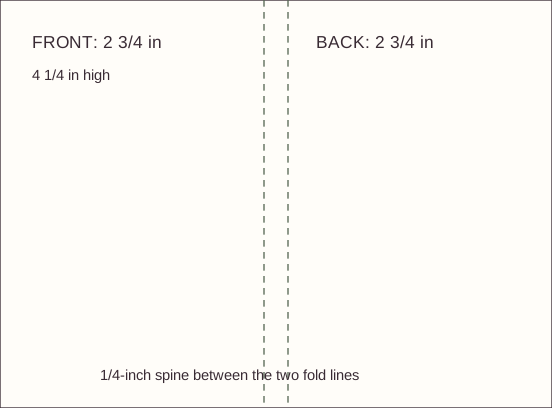
<figcaption>Solid outside line: cut. Dashed vertical lines: crease. The two panels are each 2¾ inches wide. <a href="/images/bridal-favor-tea-wallet.svg">Download the tea-wallet SVG</a>.</figcaption>
</figure>

1. **Measure the packet while sealed.** Include its crimped edges and the thickest part. For this pattern, the proposed maximum is 2½ inches wide, 3¾ inches high and ⅛ inch thick.
2. **Cut the 5¾ × 4¼-inch rectangle.** Score the two vertical fold lines at 2¾ and 3 inches from the left edge. Their ¼-inch gap is the spine.
3. **Fold around the spine.** Bring the two wide panels together like a book, with the narrow spine between them. This is an open-sided wallet, not a sealed pocket.
4. **Place the packet inside.** Keep its original seal intact and its ingredient and use information available. Close the wallet without pressing on the sachet.
5. **Tie the ribbon around the closed wallet.** Use a closure the guest can remove without scissors. Check that the packet does not slip out during the handling you expect, then add a short external note such as “A cup for a quiet moment.”

If the packet is too thick, the panels bow or the sealed edge bends, change the pattern or the item. Do not trim the manufacturer's wrapper to make it fit. The fit check should include opening the wallet and removing the packet, not merely arranging it for a photo.

## Band a cloth napkin without squeezing it

The favor is the **whole cloth napkin**, not just the decorative band. Choose a cloth whose care information can stay with the gift. Keep tags or a small care note accessible, and do not describe the cloth as dishwasher-safe, stainproof or washable at a particular temperature unless its manufacturer says so.

<figure>
<img src="/images/bridal-favor-napkin-band.svg" alt="Original 9.5 by 1.5-inch napkin-band pattern with a half-inch marked overlap tab at one end, producing a nine-inch paper loop." width="912" height="144" loading="lazy" decoding="async" />
<figcaption>The ½-inch overlap joins paper to paper. Do not attach adhesive to the cloth. <a href="/images/bridal-favor-napkin-band.svg">Download the napkin-band SVG</a>.</figcaption>
</figure>

1. Fold or roll one actual napkin into the bundle you intend to give. Use a clean, dry surface.
2. Measure around the bundle with a flexible tape or a scrap strip of paper. This is its circumference, not its diameter. The standard template is intended for a bundle at most 8½ inches around.
3. Cut the 9½ × 1½-inch band. Wrap it around the bundle and overlap the final ½ inch, producing a nine-inch loop before accounting for paper thickness.
4. Join the overlap with a small amount of suitable paper adhesive or double-sided paper tape. Keep the join clear of the cloth. Do not crease the band hard enough to compress the napkin.
5. After the join is secure, slide the band off and back on. It should move easily without snagging or needing the napkin to be squeezed.

For another bundle size, start with **strip length = measured circumference + ½-inch proposed ease + ½-inch overlap**. That half-inch ease is our design allowance, not a universal fit. Make a sample and adjust it for the actual fabric thickness and fold. If you want a more decorative fold, the [napkin folding guide](/stories/napkin-folding-ideas) keeps those instructions in one place.

## Make a bookmark with a protective paper sleeve

Use a 2 × 6-inch bookmark blank. Leave the face plain, handwrite a name or add an original small drawing. Do not print a long borrowed poem or licensed illustration merely because the piece is a favor. A bookmark with a simple date or note is already complete.

<figure>
<img src="/images/bridal-favor-bookmark-sleeve.svg" alt="Original bookmark sleeve net with two 2.25-inch panels, a quarter-inch side tab and half-inch bottom flap, alongside a 2 by 6-inch bookmark." width="840" height="720" loading="lazy" decoding="async" />
<figcaption>The sleeve is open at the top. Its planned 5½-inch pocket leaves ½ inch of the six-inch bookmark visible. <a href="/images/bridal-favor-bookmark-sleeve.svg">Download the bookmark and sleeve SVG</a>.</figcaption>
</figure>

1. **Cut the bookmark and sleeve net.** The net's full bounding dimensions are 4¾ × 6 inches. Cut away the area beneath the back panel and side tab, keeping the bottom flap beneath the front panel only.
2. **Score the three folds.** The vertical panel fold is 2¼ inches from the left edge; the side tab starts at 4½ inches. The horizontal bottom flap begins 5½ inches below the top, across the front panel only.
3. **Fold the front over the back.** Bring the left panel across the center fold to meet the back panel. Turn the ¼-inch side tab over its exposed edge and glue the tab to the outside of the front. Keep glue out of the pocket.
4. **Close the bottom.** Fold the ½-inch front flap around the bottom edge and glue it to the outside of the back. Let the adhesive dry as directed.
5. **Check the pocket.** Slide the actual bookmark in and out. It should enter freely and leave enough of its top exposed to grip. Reject a sleeve with adhesive inside or a seam that pulls apart.

The paper's thickness reduces the usable inside width slightly. If a laminated or unusually thick bookmark binds, make a wider sample rather than forcing it. The pattern does not require a decorative notch: the protruding bookmark is the grip.

## Make a batch after the sample passes

For a worked **12-guest batch, aim for 14 usable favors**; for **24 guests, aim for 26**. The two spare finished pieces are an editorial allowance for a damaged item or a late addition, not a requirement to give every guest two favors. Count the people who actually want the chosen item before shopping, then choose your own reserve. Buy an additional sample item if you cannot give your approved sample to a guest.

The following yields are **hand-cut layouts on plain A4 or Letter sheets**, using the approved pattern as a reusable tracing guide. They allow a ½-inch outside margin and at least ¼ inch between pieces. They are not the number of blanks on each page of the downloadable pattern PDF, which is a single-project instruction packet.

<table>
<caption>Proposed cutting yields and paper counts for one selected favor project</caption>
<thead><tr><th scope="col">Paper piece</th><th scope="col">How to arrange it on a sheet</th><th scope="col">Yield per sheet</th><th scope="col">14 usable pieces</th><th scope="col">26 usable pieces</th></tr></thead>
<tbody>
<tr><th scope="row">5¾ × 4¼-in tea wallet</th><td>Portrait sheet; stack two across an 8¾-in total height, including one ¼-in gap.</td><td>2</td><td>7 sheets</td><td>13 sheets</td></tr>
<tr><th scope="row">9½ × 1½-in napkin band</th><td>Landscape sheet; four parallel rows across a 6¾-in total height, including three ¼-in gaps.</td><td>4</td><td>4 sheets, yielding 16 bands</td><td>7 sheets, yielding 28 bands</td></tr>
<tr><th scope="row">2 × 6-in bookmark</th><td>Portrait sheet; three upright pieces in a 6½-in total width, including two ¼-in gaps.</td><td>3</td><td>5 sheets, yielding 15 bookmarks</td><td>9 sheets, yielding 27 bookmarks</td></tr>
<tr><th scope="row">4¾ × 6-in sleeve bounding area</th><td>Portrait sheet; one full net. Keep its bottom flap in the outline.</td><td>1</td><td>14 sheets</td><td>26 sheets</td></tr>
</tbody>
</table>

Thus the bookmark project needs **19 material sheets for 14 bookmark-and-sleeve sets**, or **35 for 26 sets**, when bookmarks and sleeves use separate papers. These are geometry-based yields before rejected cuts or extra samples. Start the supply allowance with one additional sheet of each chosen paper, then adjust after your real cutting check. The sleeve's cut-away corners are scrap, not a second favor.

<table>
<caption>Non-paper materials for the proposed 12- or 24-guest batch</caption>
<thead><tr><th scope="col">Chosen project</th><th scope="col">12 guests plus 2 spares</th><th scope="col">24 guests plus 2 spares</th><th scope="col">Sample decision</th></tr></thead>
<tbody>
<tr><th scope="row">Tea wallets</th><td>14 compatible sealed packets; 14 ribbon lengths</td><td>26 compatible sealed packets; 26 ribbon lengths</td><td>At an approved 18-in ribbon length, use 7 yd / 6.40 m or 13 yd / 11.89 m before waste.</td></tr>
<tr><th scope="row">Napkin bands</th><td>14 whole cloth napkins; 14 paper-to-paper joins</td><td>26 whole cloth napkins; 26 paper-to-paper joins</td><td>One ½ × 1½-in tape strip per overlap would use 21 or 39 in of ½-in-wide tape before waste.</td></tr>
<tr><th scope="row">Bookmark sleeves</th><td>14 bookmarks; 14 side joins and 14 bottom joins</td><td>26 bookmarks; 26 side joins and 26 bottom joins</td><td>Use adhesive only in the tabs; measure product use on the approved sample before ordering.</td></tr>
</tbody>
</table>

For the tea example, adding a chosen 10% cutting allowance and rounding up to whole yards gives **8 yards for 14 favors or 15 yards for 26**. Use the ribbon length from your own tied sample if it differs. For tape or glue, package capacity depends on the product and how you apply it; the join counts tell you how many repeats to plan without pretending that one tube serves a fixed number of guests. Keep the tea's original ingredient information available, as recommended in [FDA food-allergy label guidance](https://www.fda.gov/food/nutrition-food-labeling-and-critical-foods/food-allergies).

Separate the work into cutting, scoring, assembly and final checking. Write the confirmed number of usable finished favors on the batch sheet. A pile of cut blanks is not the same as a finished count: allow room in your plan for any damaged cuts or failed seams without assuming every page will succeed.

Keep one approved sample beside the work area. Check the first finished item again after changing paper, ribbon or adhesive. For wallets, keep tea varieties and their original labels identifiable. For napkins, keep care information with the correct cloth. For bookmarks, let glued seams dry before packing the sleeves together.

Give one co-host responsibility for storing and transporting the finished pieces. Put loose paper favors in a shallow, dry container rather than a bag where corners can crush. Record the destination and setup owner in the [bridal shower planning checklist](/stories/bridal-shower-planning-checklist). Put actual materials and printing costs in the [bridal budget worksheet](/stories/bridal-shower-budget-worksheet).

Count **passed pieces + repair pieces + rejected pieces = all assembled pieces**. Only passed pieces belong in the pickup count. If the goal is 14 and 13 pass, make or repair one more; do not hide a failed seam among the spares. The new batch sheet separates these counts from blank-cut counts and includes actual package prices, storage, transport and the person responsible for setup.

## Give guests a simple pickup and record what remains

Set out one finished favor per confirmed recipient, with the two spares in a separate dry container. Use one short sign: “Please take one if you would like one. Thank you for celebrating with us.” A guest can decline without being asked why. Keep the tray separate from food service so a decorative tea wallet is not mistaken for something to open at the buffet.

At setup, record the **quantity placed out and quantity held in reserve**. At the end, count intact items still out, intact reserve and any damaged pieces. Calculate taken favors as opening intact stock minus closing intact stock minus damaged or removed pieces. That count is useful for the host's stock record; it does not identify which guest took a favor. Decide who takes intact leftovers home and keep the tea or cloth information with them.

## Download the full-size favor patterns

The free four-page packet includes the tea wallet, landscape napkin band, bookmark and sleeve, and a sample-fit and batch record. Choose **[US Letter patterns](/downloads/bridal-favor-patterns-letter.pdf)** or **[A4 patterns](/downloads/bridal-favor-patterns-a4.pdf)**. Print the pattern pages at actual size, measure the calibration line and make one sample before scaling up. The vector lines stay sharp; the files contain no AI photographs.

For the expanded 12/24 supply plan, also download the separate **[Letter favor batch worksheet](/downloads/bridal-favor-batch-letter.pdf)** or **[A4 favor batch worksheet](/downloads/bridal-favor-batch-a4.pdf)**. Its two pages contain the cutting-yield reference, sample approval fields, a shopping and cost record, finished-quality counts, and the pickup/leftover handoff. It is a writing worksheet, not another full-size cutting pattern or an editable form. Print it single-sided on ordinary paper; keep the original measured pattern packet for tracing.

## Bridal shower favor questions

**Do I have to make favors?** Choose them only if they fit the gathering and budget. These projects are optional. A guest should not be asked to assemble their gift unless you have agreed on an activity format.

**Can I put loose tea in the paper wallet?** No. This wallet holds an individually sealed manufacturer's packet. It is open-sided decorative packaging, not a tested food pouch.

**Will the napkin band fit every cloth napkin?** No. It is a nine-inch loop designed around a proposed maximum 8½-inch bundle circumference. Measure the actual fold and test the ease before making more.

**Can I resize the PDF to fit my item?** Do not scale the whole page without understanding that every dimension and the calibration line will change. Make a deliberately resized pattern from your measurements, then test a sample. For the supplied sizes, print at 100%.

## Images from this guide

![A paper tea wallet with rose ribbon, sage cloth napkin with an ivory band, and an ivory bookmark in a rose sleeve on cream linen.](https://feteandfig.com/images/bridal-favors-three-projects-1600.webp)

Three favors with a useful item and simple paper finish. AI-created styling concept; use the measured patterns rather than the photograph for sizing.

![An open cream paper wallet holding a sealed tea sachet, with rose ribbon, a folding tool and ruler nearby on oak.](https://feteandfig.com/images/bridal-favors-wallet-assembly-1600.webp)

AI-created tea presentation concept. The measured wallet uses two plain panels without a pocket; keep the original tea wrapper sealed.

![Five rose floral paper sleeves with ivory bookmarks protruding from notched tops, on cream linen beside a spare bookmark.](https://feteandfig.com/images/bridal-favors-bookmark-batch-1600.webp)

AI-created decorative concept. The downloaded sleeve pattern has a straight top, without a notch or floral artwork. Check one sample before making more.